Categories > Guides and Tips

Essential Guide to Rendering a Brick Wall in Brisbane
Rendering a brick wall is a process that can be used to change the appearance of a wall. If you are planning to render a brick wall in Brisbane, there are some things you need to know in order to do it successfully. Here, we will guide you through this process.
What is a Rendered Brick?
Rendering is the process of applying a coating on the property’s walls with cement to make them smooth and achieve the desired texture. For a rendered brick, the usual mixture applied on its surface is composed of cement, sand, and lime.
With rendering, your walls are protected from the different weather conditions, and general wear and tear. Meanwhile, other rendering options available include acrylic, polymer, and silicone, among others.
As rendering smoothens the wall, it creates a more modern and polished look compared to the traditional aesthetics of a brick wall. Aside from aesthetic purposes, rendering also makes your wall more durable since it strengthens it to withstand various elements.
Tools and Materials Needed
Before you begin the process of rendering your brick wall, prepare the necessary things first. The following tools and materials are needed in rendering.
Tools
-
-
- Stiff Broom
- Mixing bucket or wheelbarrow
- Mixing Drill
- Float
- Chisel
- Sponge
- Straight edge
- Trowel
- Bristle brush
- Spray hose
- Shovel
- Scratching comb
-
Materials
-
-
- Render
- Cardboard or drop cloth
-
Steps on How to Render a Brick Wall
Here, we will outline the necessary steps on how to render a brick wall. Regardless of the materials and the type of render used, this process is generally applicable.
1. Prepare the Wall for Rendering

Prepping the wall is important in the rendering process. This will ensure that the wall is even when applied with render and won’t crack quickly. Here, you are also making sure that the surface is dust-free and grease-free.
Here are the essential steps on how to prepare a brick wall for rendering.
- Remove the old render or paint with the use of a chisel. Scrape any bumps and rough patches that are stuck on the brick wall.
- Thoroughly scrub the wall using a stiff broom to remove dirt and other debris on the surface. You can also use soap to remove and clean dirt.
- Use a garden hose and spray the wall’s surface with water. This will prevent the wall from getting too dry and drying out the mortar.
- Protect your floors by laying down cardboard or drop cloths. This will avoid the render from dripping on your floors.
2. Mix the Render

Now, it’s time to mix your render mortar. Follow these instructions.
- Your purchased render mortar has instructions on the back of its packaging. Read it carefully to know the proper mixture and how much water you should add.
- Have the right amount of water in a bucket or wheelbarrow.
- Pour the render mortar into the water and mix them together. First, you can simply use a shovel in mixing them. Then, switch to a paddle mixer that is attached to a power drill in order to create an even mixture.
- You’ll know that the render is completely mixed if it has already a toothpaste consistency.
Different Types of Rendering Materials
The following are the different types of rendering materials that are available in Brisbane. Read more about each of them to help you decide the best option for your home.
1. Cement Render

This is the most popular rendering material and an affordable option as well. It is typically a mixture of sand, cement and/or lime. It is well-known for its strength and durability and provides a smooth finish to walls.
The best rendering mix is composed of 6 parts sand, 1 part cement, and 1 part lime. It is important to keep this ratio and use no more than one part lime to one part cement because lime needs cement to assist it in the setting.
Lime is added just enough to make the mixture creamy and stretchy, making it self-rendering and self-curing. As a result, it also prevents cracking. However, you might ask if you can render without lime in the mixture, and use only sand and cement.
The use of sand and cement without lime in rendering has already been practiced centuries ago. This traditional method of rendering provides a smooth finish, but take note that the resulting mix from this can be structurally rigid which is prone to cracking.
The render abruptly expands in the summer and contracts in the winter due to abrupt temperature changes. When the sand and cement rendering mixture is exposed to extreme weather, such as in the summer or winter, this will lead to cracks.
2. Acrylic Render

Acrylic render is almost the same as cement except that it contains an acrylic plastic in the render mix. As acrylic has flexible properties while remaining durable, it is a popular alternative to cement as it resists cracking. But it cost more than a cement render.
3. Silicone Render

Silicone is a modern rendering option that offers more waterproofing, flexibility, and durability than other types of rendering materials. The silicone material provides a breathable walling and allows any moisture to escape to the surface of the wall.
4. Polymer Render

This is relatively the latest rendering material available in the market, offering several benefits such as water-repellent and very adhesive properties. The polymer render is mixed with either a cement or a lime base. Its downside is that it is an expensive option.
5. Lime Render

Lime rendering is a traditional method that is common among older houses. Despite being an old method, it is still being used today because it is considered the most breathable option for walls. It prevents moisture on your walls and also avoids damps.
6. Bagging Render

Bagging render features a coarse finish that can be visible on your walls. However, such imperfections can be a great choice if you are going for a rustic look in your home. Bagging render is maybe the most affordable option and cheaper than cement material.
3. Apply the Render

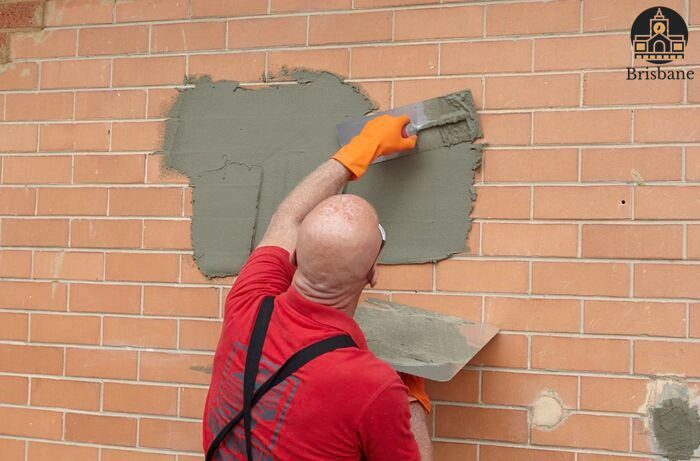
The next step is to apply the render on the surface of a brick wall. The technique here is to apply the render as flat and smooth as possible.
- By using a trowel, smear the render onto the wall and press it firmly. Spread the render on the surface in one solid motion. The thickness of the first coat of render should be around 5mm.
- Get a straight edge and scrape the surface to even out the render. Do this from the bottom to the top direction.
- Scratch the entire surface of the render from the left to right direction using a scratching comb. This will create depressions on the first coat of render and will help adhere to the second coating.
- Before beginning to apply the second coating, let the first layer render dry for around two hours first.
- When the first layer is completely dry, you can now apply the second coat of render and the thickness should be 10mm. Just repeat the application that you did on the first coating except that this layer should be thicker.
- Let the second layer dry for around 30 minutes and level it out using a float. In this step, you will flatten any bumped areas and fill up any depressions.
4. Sponge the Render for a Smooth Finish

To smoothen out the newly-applied render, you need to sponge down the entire render. While a damp sponge is needed for this step, make sure that it’s not too wet. Clean and squeeze out the sponge every now and then to avoid scratching the finish.
On the contrary, a soft-bristled brush is needed instead of a sponge if you want to achieve a brushed finish render. Take note that you are able to do this if the render is still wet.
5. Cure the Render

To protect the newly-rendered wall, you need to cure it for around five days. Let the wall dry for 24 hours first and then, moisten it with room-temperature water by using a spray. Spray the wall once a day and after five days, it should be completely cured.
Curing of render is a necessary step as it lessens cracking on the surface and at the same time, adds strength to the wall. The requirement here is to keep the rendered surface wet for a certain period of time.
DIY Rendering
While the above-mentioned steps can guide you to DIY rendering your brick wall, keep in mind also that it’s a job that requires some skill and a lot of practice. It’s not recommended to start rendering your house walls if you have never done it before.
On the other hand, your best option is to hire professional wall-rendering services to get the job done properly. These professionals have the know-how for the proper execution of rendering tasks and have all the equipment necessary to achieve quality results.
Top Brick Wall Rendering Services in Brisbane
If you decide to hire a professional brick wall rendering service in Brisbane, check out the following companies. For more info, contact each one of them.
1. SCR Rendering Brisbane

SCR Rendering is a small rendering and solid plastering business based in Brisbane. They are fully licensed with the Queensland Building and Construction Commission (QBCC) and carry relevant insurances such as WorkCover and Public Liability.
| WEBSITE: | https://scr-rendering.com.au/ |
| ADDRESS: | Ferny Grove, QLD, 4055 |
| CONTACT INFO: | +61 422 983 942, [email protected] |
| OPERATING HOURS: | Monday – Friday: 7AM-5PM, Saturday: 7AM-11AM |
2. Brisbane Rendering

Brisbane Rendering started last 2008 with a vision to provide high-quality services to its customers. They offer residential rendering and painting services in Brisbane as well as in the entire South-East Queensland region.
| WEBSITE: | https://brisbanerendering.com.au/ |
| ADDRESS: | 1/11 Didswith St, East Brisbane QLD 4169, Australia |
| CONTACT INFO: | +61 409 627 020, [email protected] |
| OPERATING HOURS: | Monday – Friday: 6AM-6PM |
3. Rapid Rendering

Rapid Rendering has more than 15 years of experience being in the rendering industry. They have fully licensed and insured renderers, offering their expertise throughout Brisbane and the surrounding areas of Queensland.
| WEBSITE: | https://rapidrenderingbrisbane.com.au/ |
| ADDRESS: | PO Box 70 Browns Plains BC, QLD 4118 |
| CONTACT INFO: | +61 1300 590 526, [email protected] |
| OPERATING HOURS: | Monday – Saturday: 9AM-5:30PM |
4. Rock Solid Rendering QLD

Rock Solid Rendering QLD is a family-operated business. The owner, together with his team of skilled renderers offer interior and exterior services for residential and commercial properties. They are based in Brisbane but also serve other nearby areas.
| WEBSITE: | https://www.rocksolidrendering.com.au/ |
| ADDRESS: | Macgregor QLD 4109, Australia |
| CONTACT INFO: | 0427 718 718, [email protected] |
| OPERATING HOURS: | Monday – Sunday: 6:30AM-8PM |
5. Texture Coating QLD Pty Ltd

Texture Coating QLD Pty Ltd offers coating or rendering services throughout Southeast Queensland including Brisbane. Whether it is a residential or commercial property, they are committed to exceeding your expectations.
| WEBSITE: | https://www.texturecoatingqld.com.au/ |
| ADDRESS: | PO Box 103, Corinda QLD 4075 |
| CONTACT INFO: | +61 413 830 664, [email protected] |
| OPERATING HOURS: | Monday – Wednesday: 7AM-6PM, Friday and Saturday: 7AM-6PM |
Cost of Hiring a Professional Rendering Service in Brisbane
Professional renderers in Brisbane usually charge by square meter. The cost of hiring a professional service may vary based on a number of factors. Here’s their range of service fees based on the two most common types of rendering materials.
1. Cement Rendering Cost
Cement rendering costs between $30 and $80 per square meter. However, you can avail for as low as $15 per square meter at a discounted rate for some renderers.
2. Acrylic Rendering Cost
Acrylic rendering costs higher at around $30 to $80 per square meter.
On the other hand, the following are some of the factors that can affect the cost of rendering:
- Preparation work needed
- Accessibility to your home or property
- The material type and finish of render
Why You Should Consider Rendering Your Brick Wall
While one obvious reason to render a brick wall is to enhance the curb appeal of a home or property, it also brings a lot of other benefits. The following are some of the benefits of having a rendered brick wall.
1. Enhances the Appearance of the Wall

Rendering is one way to take the appearance of your brick wall to the next level. Whether it is a home or a commercial building, the smooth and seamless look of a rendered brick wall gives a modern and luxurious look.
2. Protection from Harsh Weather Conditions

With rendering, the underlying walling material will be protected from various elements and harsh weather conditions. Whether it is rain, scorching heat, or UV rays, rendering adds a layer of protection to your brick wall to withstand these elements.
3. No Need to Paint the Wall

Nowadays, there are pre-coloured renders available in which you would simply pick the color that you want and the render will then be applied in that color. As a result, you can save on the painting costs as it will not require painting for up to 30 years.
4. Water Repellent

Most renders are mixed with lime which improves the breathability of a wall and thus, prevents moisture from getting trapped, allowing it to simply evaporate. This water-repellent property helps protect your brick walls from dampness.
5. More Aesthetic Options

Aside from a variety of colors, many renders today are also available in different textures and styles, giving you more aesthetic options. With a lot of options to choose from, it would be easy to match a rendered wall to the overall style of any house.
6. Provides Additional Insulation

Another key feature of a rendered wall is that it provides additional insulation to your home. The applied render will act as a shield from the effects of outdoor elements such as heat and cold. Take note that a well-insulated home is also energy-efficient.
Rendering a brick wall is a relatively simple process, but there are a few things that you need to keep in mind to get the best results. The above-mentioned steps and other points discussed will guide you through this method of applying layers to your wall.


