Categories > Guides and Tips
Guide to TV Antenna Installation Cost in Brisbane

- Cost of TV Antenna Installation
- Factors That Can Affect the Cost of TV Antenna Installation
- Type of the Antenna
- Location
- Building Type
- Additional TV Points
- The Need for Signal Boosters
- Different Types of TV Antennas
- Yagi
- Log Periodic Antenna
- Phased Array
- Dipole
- Loop
- How to Install a TV Antenna
- Indoor TV Antenna Installation
- Decide Where to Put Your Indoor TV Antenna
- Plug in the Coax Cables
- Scan for Channels
- Outdoor TV Antenna Installation
- Decide a Location for the Antenna
- Decide What Mount Type to Use
- Small J Pole
- Large J Pole
- Wall Mount
- Chimney Mount
- Eave Mount
- Tower
- Assemble the Antenna
- Attach the Mount and TV Antenna
- Connect the Coax Cables
- Plug the Coax Cable into the “Ant In”
- Scan for Channels
Are you tired of pixelated TV reception and fuzzy channels? It’s time to consider installing a TV antenna!
But before you jump into it, it’s important to know how much you should expect to pay for installation. After all, nobody likes to be caught off guard by hidden fees and unexpected expenses.
In this article, we’ll walk you through everything you need to know about TV antenna installation costs. From the different factors that affect the price to the average cost range for the installation, we’ve got you covered.
If you’re looking for professional TV antenna installers, you can check our article here. Now let’s take an in-depth look at how much this will all cost.
Cost of TV Antenna Installation

In Brisbane, the average TV antenna installation costs between $60 and $70 per hour. However, some variables can affect this cost such as the location, the complexity of the job, and the type of mount to be used, among others.
There are a variety of ways and sites to install TV antennas. Each installation option costs differently since it requires varying amounts of labor and expertise.
Below are the different types of TV antenna installation and their corresponding costs.
| Type of TV antenna installation | Average Cost |
| Indoor antenna | $150 to $300 |
| Outdoor antenna | $400 to $500 |
| Installing TV antenna in a loft | $350 or less |
| Antenna point installation | $100 to $500 |
| Digital TV antenna | $250 to $500 |
Factors That Can Affect the Cost of TV Antenna Installation
1. Type of the Antenna

The type of antenna you will use accounts for a significant portion of the cost associated with the installation. Basically, TV antennas can be classified into two main types: indoor and outdoor.
Indoor antennas are generally cheaper than outdoor antennas and you can even install them yourself to save on labor costs. However, many Australians opt for an outdoor antenna as it typically provides better signal quality.
Below is the list of the different types of TV antenna and their corresponding average prices.
| Type of Antenna | Average Price |
| Yagi (outdoor antenna) | $280 – $330 |
| Log Periodic Antenna (outdoor antenna) | $200 – $970 |
| Phased Array (outdoor antenna) | $45 – $270 |
| Dipole (indoor antenna) | $60 – $150 |
| Loop (indoor antenna) | $48 – $70 |
The signal type and strength in your location will also determine the type of antenna you need, whether it’s a UHF or a VHF. If your area doesn’t have a strong signal, a larger antenna might be required.
What is the difference between UHF and VHF?
UHF (Ultra High Frequency) and VHF (Very High Frequency) are two types of signals used in TV antennas and each has its own unique characteristics.
VHF has longer wavelengths and is ideal for outdoor use and operations over wide, obstruction-free areas. UHF operates at a higher frequency, making them perfect for wireless communications that must pass through obstructions like buildings and walls.
Heavy-duty antennas can withstand harsh weather and last for decades. Stainless steel is a good option, especially if your home is subject to salty winds from a nearby beach.
Other heavy duty antennas are made of copper and metal coat hangers. These high-quality materials last longer, but they come at a higher price too.
2. Location

In Australia, different areas such as cities or suburbs may have different standard rates of TV antenna installation. The table below shows a comparison of TV installation costs in Brisbane to other major cities in Australia.
| City | Antenna Installation Cost (per hour) |
| Brisbane | $60 – $70 |
| Sydney | $70 – $80 |
| Melbourne | $70 – $80 |
| Canberra | $60 – $65 |
| Perth | $65 – $75 |
Meanwhile, your home’s location will affect the kind of antenna you need as well as the cost of the installation. For instance, you might need to use a high mast to raise the height of your antenna if your location has many hills, black spots, or weak signals.
Moreover, your technician might need to spend more time on-site performing additional testing and perfecting the positioning.
3. Building Type

The type of building where the antenna will be installed significantly affects the installation cost. Standard pricing is often based on single-story, stand-alone residences because they are typically easier to access.
The installation will probably be more difficult and require more tools and wiring if you reside in a two-story house or townhouse. If you live in an apartment complex, you’ll also need to take into account the additional degree of complexity to get the job done.
The table below shows the average costs for the single-story and multi-story TV antenna installation.
| Type of Installation | Average Installation Cost |
| Standard TV Antenna Installation | $150 – $500 |
| Multi-Story Building TV Antenna Installation | $300 – $900 |
4. Additional TV Points

If you’re installing a TV antenna for the first time, most likely, you’ll also need additional TV points installed. Perhaps you might wish to install some more TV points so you can watch TV in both the TV room and the bedrooms.
With extra TV points, it also means more labor, cabling, splitters, and other parts are needed. Thus, you’ll anticipate that adding a TV point will raise the cost of installing a TV antenna.
The antenna point installation cost is around $100 in houses with only one TV wall point. However, this price can go up to more than $500 if there are more than three TV points to be installed in a multistory home.
6. The Need for Signal Boosters

If you live in a low-signal location, you might need a TV amplifier or signal booster to raise your signal to the required level. It’s also necessary to use an amplifier if your signal is divided over several TV wall points and drops below the required level.
The two different types of TV amplifiers are masthead amplifiers and distribution amplifiers. There are countless variations of each and it needs an experienced professional to select the right amplifier to be used.
The recommendation from the installer is based on where your signal is weakening and how much boost is required. As a TV amplifier is an additional piece of equipment and requires additional processes, it will then increase the cost of installation.
Different Types of TV Antennas
1. Yagi

This type of antenna is commonly used in the majority of cities in Australia. A Yagi antenna is a directional outdoor antenna that prioritizes signal reception in one direction over all others. Its average price ranges between $280.00 and $330.00.
Yagi is known as a high gain, which can receive weak signals much more effectively than other kinds of antennas. If you reside in a remote area where the maximum gain is necessary to pick up a weak signal, a Yagi antenna can be a good choice.
Yagi antennas are compatible with frequencies in the VHF to UHF range. In fact, they are often VHF/UHF combination antennas because most places use a mix of VHF and UHF channels.
2. Log Periodic Antenna

A log periodic (LP) antenna, sometimes known as a log-periodic dipole array (LPDA), is a multi-element attic or outdoor directional antenna. It’s designed to work across a broad frequency range. This type of antenna costs around $200.00 to $970.00.
It functions like a series of interconnected Yagi antennas, with each tuned to different frequencies. A log periodic antenna tends to provide a cleaner signal than a Yagi, although having a lower gain (signal strength) for the same size.
The LP handles a range of frequencies more effectively while the Yagi offers more amplification for a particular frequency. In suburban and rural locations with weak signals, Log periodic antennas are a great option.
3. Phased Array

Basically, a phased array antenna is a flat panel with a few additional components in front of it. In regional areas, they are generally used for UHF. They work well in remote locations and in weak signal places that are far from TV stations.
It is crucial that this type of antenna is positioned in the proper direction for the proper polarization. Thus, double-check that you’ve positioned it correctly for the transmitter you’re aiming it at. Phased array antennas may cost from $45.00 to $270.00.
4. Dipole

One of the most popular forms of indoor TV antennas is the dipole, also known as the “rabbit ear” antenna. In this type of antenna, two “poles” work together to capture the broadcast signal. The price for dipole antennas is around $60.00 to $150.00.
Despite the fact that they frequently resemble rabbit ears on a television set, where both poles extend out, this isn’t always the case. They can be positioned in such a way that they can be pointed in the direction from which the signal is broadcast.
With that, it allows this type of antenna to receive the signal on a plane, where it will be picked up more clearly and strongly than with a monopole. Moreover, a dipole antenna is most efficient in receiving very high frequency, or VHF.
5. Loop

Another common indoor TV antenna is the loop antenna. It’s somehow a variation of the dipole, with its two poles folded back to meet one another.
While it’s frequently configured in a circle, it can also form a square, or a series of squares or circles. You can buy this type of antenna for around $48.00 to $70.00.
Loop antennas are effective for receiving UHF, or ultrahigh frequency. The flat, rectangular indoor antennas that were quite common since the transition from analog to digital broadcasts are made with a metal loop antenna inserted in conductive plastic.
How to Install a TV Antenna
Whether you choose a simple indoor antenna or a more complex one like an outdoor antenna, installing them is a one-time job that gives you access to several free channels. Below are the instructions on how to install indoor and outdoor TV antennas.
Indoor TV Antenna Installation
Indoor antennas are simpler to install, and by positioning them properly, you can access a number of free channels. It works best for DIY’ers who simply need a few free channels.
Here are the steps to quickly install your indoor TV antenna.
1. Decide Where to Put Your Indoor TV Antenna

The location of your local TV broadcasters determines the ideal location to mount your indoor TV antenna. For optimal results, point the antenna in the general direction of the nearby broadcast stations.
The number of channels available and the picture quality are significantly affected by where you set your antenna. Fortunately, installation is less complicated for indoor antennas as they are often installed vertically with adhesive to the walls or windows.
Today, there are some antenna brands that have smartphone apps available for download. Part of these apps allows you to determine the best spot for antenna installation.
Here are a few recommendations:
2. Plug in the Coax Cables

Depending on the make and model, most indoor antennas are pretty straightforward to install. Generally, you just connect one end of the coax cable to the antenna while the other end goes into the TV’s “ant in” port.
If there’s an amplifier included in your antenna, use the coax cables to connect the amplifier between the antenna and the TV. If your TV is analog rather than digital, you might need to use a converter box to make your antenna functional.
3. Scan for Channels

The last step in installing your indoor TV antenna is to scan for channels. Simply follow the manufacturer’s directions for the best results.
Make sure that the coax cable is the source input. Usually, the input may be called a cable, TV, or coax.
Then, press your remote’s settings button and look for the antenna menu. It might be referred to as a tuner or it might be a satellite image. Set it to “air” or “over-the-air,” then select “auto program” from the same menu to have the TV scan for available channels.
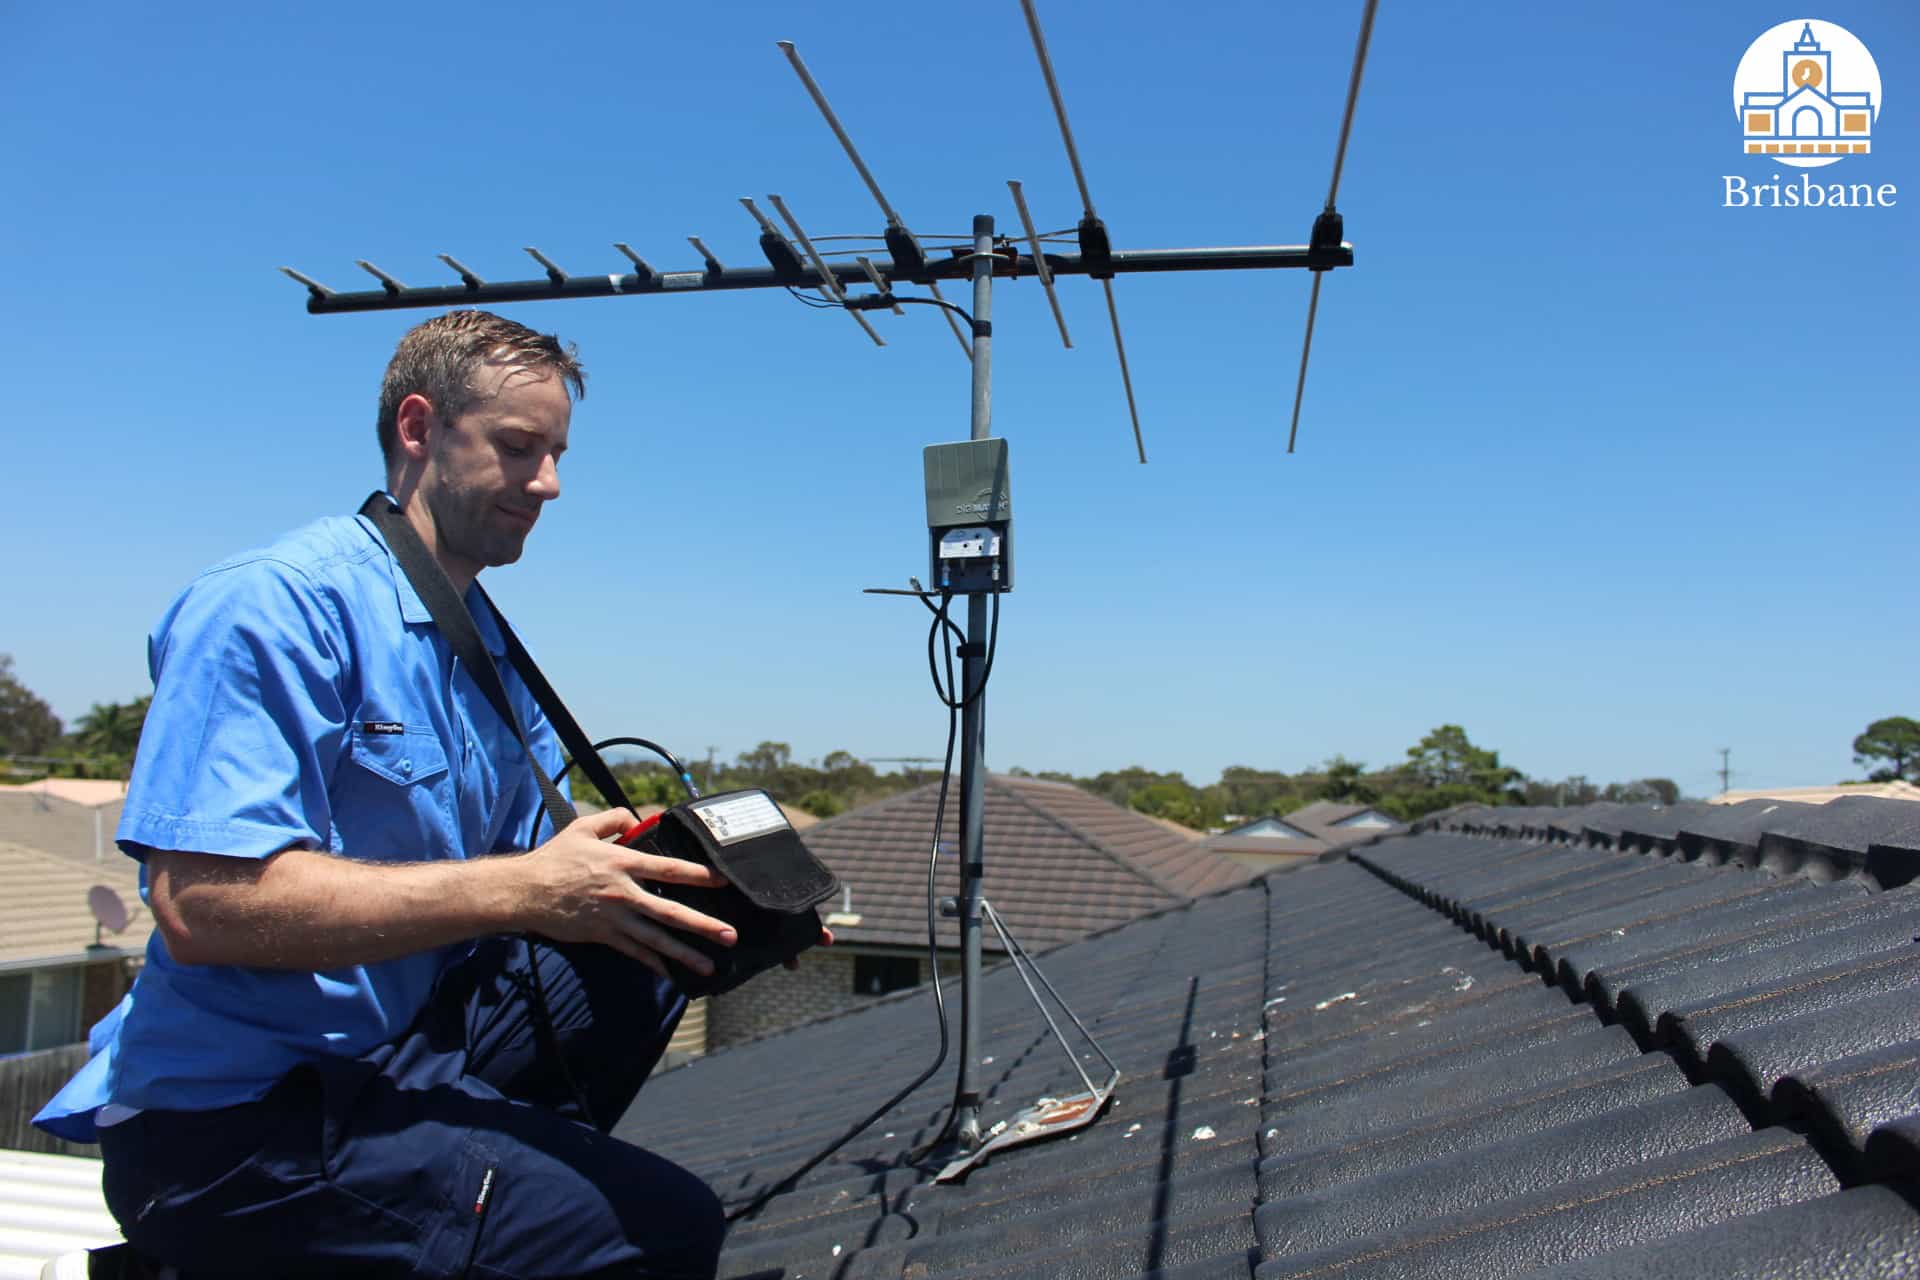
Outdoor TV Antenna Installation
Compared to an indoor TV antenna, outdoor TV antenna installation is more labor-intensive. Unless you have a lot of experience working on roofs, it’s recommended to hire a pro to do this job for your own safety.
When comparing a DIY outdoor antenna installation to a professional installation, the chances of a successful outcome are always in favor of a professional. Don’t attempt a DIY installation unless you have substantial experience working on the roof safely.
Here are the steps to install an outdoor TV antenna.
1. Decide a Location for the Antenna

The location of your antenna is important because it will determine how many channels you can receive.
It should be placed between 10 and 20 feet above the ground because the height placement improves reception.
The antenna must also point toward your local broadcasters to get the best possible signal. You should also avoid placing the antenna close to obstacles like power lines and trees.
2. Decide What Mount Type to Use
You must decide what type of mount to use when choosing where to install your TV antenna. An antenna mount is a necessary equipment to successfully position and secure an antenna in place.
In terms of size, the antenna mount must be sufficient enough to give the antenna a sturdy base. It’s also important to choose a mount based on where the antenna will be placed. The following are the common mount types and their applications.
1. Small J Pole

This mount is designed for 1- to 2-foot antennas and attaches to the roof trim.
2. Large J Pole

This is a larger version of the J pole and is designed to hold larger antennas.
3. Wall Mount

This mount type, which includes brackets to secure the pole, is ideal for installing antennas on the side of your home.
4. Chimney Mount

A chimney mount does not require drilling into the house. It just wraps around the chimney. However, do not use this type of mount on active chimneys.
5. Eave Mount

Installing this mount on your rooftop gives you a lot of height.
6. Tower

This mount offers the largest antenna option and it’s suitable for extremely remote regions. However, it requires professional installation.
3. Assemble the Antenna

Your outdoor TV antenna must be assembled on the ground before installing it on the roof or any part of your house. Just read the instruction manual on how to assemble your antenna and understand its various components.
A screwdriver, sealant, level, power drill, roofing screws, and other tools are typically needed to assemble an outdoor TV antenna. In order to find out the direction of the broadcast towers, you will also need to use a compass.
4. Attach the Mount and TV Antenna

Attaching the mount and antenna differs depending on the mount type you choose.
In order to install J-poles and wall mounts, place the unit in the desired spot on the house and mark the pilot holes. Make sure the pole is positioned properly by using a level.
Drill the pilot holes and then, screw in the lag bolts. Once it’s secure, use lag bolts to fasten the TV antenna to the mount.
Any other form of mount installation is best left to a professional. For example, installing chimney and eave mounts can be risky as they require you to work on your roof. Moreover, only experts should install towers.
5. Connect the Coax Cables

If your home already has a hardwired coax cable (which is typically the case if you previously had cable or satellite services), this step will be simpler. Find out where the coax cable enters the house because that is where you will attach your antenna.
If you don’t have an existing coax cable, you’ll need to run the coax cable from the outdoor antenna into your home.
Before you begin working with wiring, cut off all power at your main circuit box for safety precautions.
Make sure the wall is free of electrical wiring before you begin drilling holes. Leave this step to the experts if you’re unsure or lack electrical experience.
Many individuals opt to feed the cable down into the desired room through the attic wall and roof. Use a snake or fish tape to feed the cable from your attic but for a more polished appearance, add a coax outlet.
The wire can also be installed through the air ducts. Because you have to drill a hole in the air duct, fish for the coax cable, and drop it into the air duct, this option can be challenging and may require more expertise.
6. Plug the Coax Cable into the “Ant In”

Now, plug your coax cable into the “ant in” section of your TV once it is in the room where the TV is located. You may want to consider installing a coaxial cable outlet if you don’t want any visible cables.
Some outdoor antennas have a power adapter and remote control. These enable you to control the direction of your antenna without requiring you to scale your roof.
7. Scan for Channels

Depending on how everything is connected, you might be able to watch TV right away. But you need to scan for channels to make sure you’re getting the most out of the setup.
Go to the antenna menu on your TV, select “auto program,” and wait a few minutes as the antenna scans for all of the available channels.
______________________________________________________________________
With so many factors to consider in a TV installation cost, it can be difficult to know where to start. In this article, we provide you with all the information you need to make an informed decision about TV antenna installation cost.
We cover the different types of antennas available, the cost of installation, and the factors that affect installation costs. Moreover, we also provided price estimates of the different options available.